Environment
Personal (non-University) computers, staff with access to unit shared drives
Issue
How can I access my unit’s shared drive on my personal computer?
Resolution
Before you can access a shared drive:
- Review and be familiar with Individual Responsibilities outlined on the U-M Safe Computing, University Data and Personally Owned Devices web site (http://safecomputing.umich.edu/protect-um-data/owned.php/#you)
- On Windows: Install the Cisco Systems VPN with the U-M Virtual Private Network profiles. The Cisco VPN client and the appropriate U-M VPN profile provides a secure computing experience when accessing a University of Michigan network from a remote location or when using a wireless connection. The Cisco VPN client download links are on the U-M Virtual Private Network (VPN) web site at http://its.umich.edu/enterprise/wifi-networks/vpn/getting-started. A user’s U-M credentials are required to download the Cisco VPN client. A restart may be required after the installation. Open the Cisco VPN Client and pick the UMVPN - All Traffic connection profile; UMICH credentials are required to make the connection. Then map a network drive to the shared drive
- On Macintosh: Download the the Cisco AnyConnect VPN from http://its.umich.edu/enterprise/wifi-networks/vpn/getting-started and double-click it on your mac to install it Search for the Cisco AnyConnect program in your Mac's Applications folder. Open the program and then double click one of the connection options to start the VPN. Log in with your UMICH credentials (uniqname and UMICH password)
Once you have completed these steps, you can use the information below for your computer.
Windows 7
- Click the start menu and select Computer.
- From the left panel, right click Computer, and select Add Network Location
- When prompted by the wizard, enter the network path as the server address
- When asked for credentials to connect, type "umroot\uniqname" for the username and then enter your UMICH password
- Type an optional name for the resource, and finish the wizard
- Upon successful authentication, the mapped network drive will appear as a network drive
Windows 10
- Click the start menu and type This PC.
- From the left panel, right click This PC, and select Map A network Drive
- When prompted by the wizard, enter the network path as the server address
- When asked for credentials to connect, type "umroot\uniqname" for the username and then enter your UMICH password
- Type an optional name for the resource, and finish the wizard
- Upon successful authentication, the mapped network drive will appear as a network drive
To map a personal U drive from home on Windows, the drive mapping would be \\adsroot.itcs.umich.edu\home\username\Documents (replace username with your uniqname).
Windows 11
-
Open File Explorer from the taskbar or the Start menu, or press the Windows logo key + E.
-
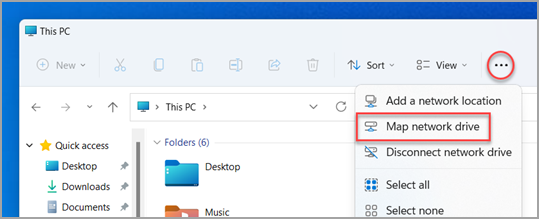
Select This PC from the left pane. Then, on the File Explorer ribbon, select More > Map network drive.

Note: If you don't see Map network drive on the More menu, you can right-click the This PC node in the folder pane and you'll see the command there.
-
In the Drive list, select a drive letter. (Any available letter will do.)
-
In the Folder box, type the path of the folder or computer, or select Browse to find the folder or computer.
- For credentials use "umroot\uniqname" for the username and then enter your UMICH password
-
To connect every time you sign in to your PC, select Reconnect at sign-in.
-
Select Finish.
Mac OS X
- Open Finder
- Select Go from the title bar, then click Connect to Server
- In the server name field, enter the network path and click Connect
- When asked for a username and password, enter your full email address (uniqname@umich.edu) and your UMICH password
- Upon successful authentication, the new volume will appear on your screen
To connect a personal U drive from home on the Macintosh, the Connect to Server value to enter would be smb://adsroot.itcs.umich.edu/home/username/Documents (replace username with your uniqname).
Additional Information
If you don't have access to a shared drive, contact your Unit IT.
Need additional information or assistance? Contact the ITS Service Center.