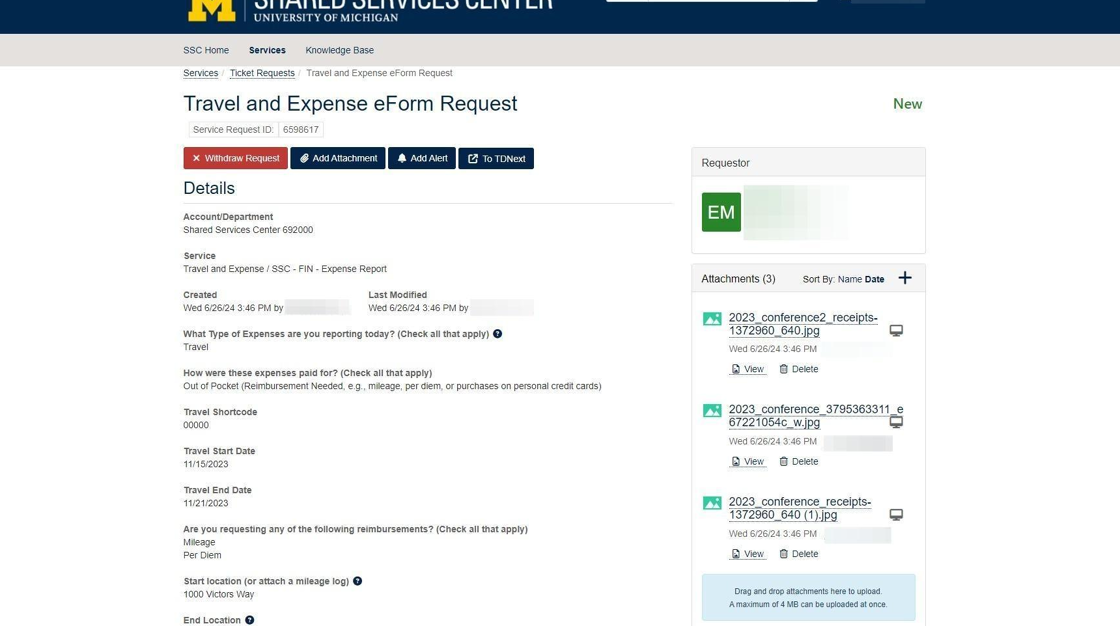
This guide provides step-by-step instructions on how to navigate the TeamDynamix client portal for your submission request. It explains how to acquire your Services Request ID, access the client portal homepage, view and update your documentation, and interact with the ticketing system. It also provides tips on searching for specific tickets and adding attachments or comments. Viewing this guide will help you manage your submission request and stay informed about its progress.
1. After submitting your documentation the system will generate a Service Request ID number for your request. Keep the ticket number for your records.

Tip! You will also receive an email notification with your ID number upon a successful submission through the eForm.
2. To review and or update your documentation, visit the Shared Services homepage. You will need to be logged in with your university credentials. Click on the My Requests at the top of the page.
. Be sure you are logged in with your university credentials. You will see a **My Requests** link at the top of the page. Click on the link.](https://ajeuwbhvhr.cloudimg.io/colony-recorder.s3.amazonaws.com/files/2024-06-26/b2dd6aa6-25bb-460e-863f-3a80aec9e74f/user_cropped_screenshot.jpeg?tl_px=0,0&br_px=1375,715&force_format=png&width=1120.0)
3. In the right-side options click My Ticket History.

4. The ticket history page displays open tickets that were created by you as the default. To look at tickets that are closed, click the Status Class drop-down menu and select the Completed status, then click Search. To view all your tickets, choose [Select all] from the Status Class drop-down, then click the Search.
![The ticket history page displays open tickets that were created by you as the default. If you want to look at tickets that are closed, click the **Status Class** drop-down menu and select the **Completed** status, then click the **Search** button. As well, if you want to view all your tickets, you can choose **\[Select all\]** from the Status Class drop-down, then click the **Search** button.](https://ajeuwbhvhr.cloudimg.io/colony-recorder.s3.amazonaws.com/files/2024-06-27/91c4a701-4782-4eb6-8a30-9923d24c1c26/user_cropped_screenshot.jpeg?tl_px=214,22&br_px=1074,502&force_format=png&width=860)
5. To view tickets where you are listed as a Contact, select the checkbox that says, Include requests that I am listed as a contact on, then click Search.

Tip! You can also export your search results to Microsoft Excel by clicking the To Excel button or print your results by clicking the Print button.
6. You may use any of the search parameters to narrow your search. To search, use the Service Request ID ticket number from your email.

Tip: Please note, any time you change a search parameter you must click the Search button to execute the search.
7. By default, TeamDynamix shows the most recently modified request at the top. To open a request in the Client Portal, click on the Title field of the appropriate request.

8. In the Client Portal you can review ticket details, add attachments, and make comments.

9. There are three ways to add attachments; the Add Attachment button near the top of the page, a drag-and-drop blue button, and the plus sign symbol in the right-hand box.

10. The drag-and-drop option is in the attachments box on the right. A maximum of 4 MB can be uploaded at once.

Tip: You can learn more about how to use the drag-and-drop feature on the
Additional Resources article.
11. In the same box, click on the plus symbol (+) to add attachments. You may also View and or Delete attachments in the same box.

12. If a request is no longer needed, click on the Withdraw Request button and follow the prompts.

13. The Feed is where communications and updates between you and the associate working on the request will be visible.

14. If you would like to answer questions or provide additional information to the team working on the request, you can click the Comment button near the bottom of the screen. Type your message into the window and click Save.
